Table Of Contents
Struggling to use Zoho SMTP Settings for a reliable and efficient cold email campaign?
SMTP, or Simple Mail Transfer Protocol, is the backbone of email-sending operations. It dictates how emails route from your mail client to the recipient’s mail server. Incorrect settings can prevent emails from being sent or in spam folders and affect your cold email outreaches.
This guide will take you through a comprehensive setup and configuration process for Zoho SMTP settings with detailed instructions.
Let’s start!
What is Zoho SMTP Setting?
Zoho Mail SMTP settings are the server parameters necessary for sending emails through a Zoho Mail account using the Simple Mail Transfer Protocol (SMTP). They are crucial for users who want to configure their email clients or applications to send emails through their Zoho Mail account.
Why Should You Use Zoho SMTP Server Settings?
Using Zoho SMTP for cold email marketing solves critical challenges and offers such value that it is an indispensable tool for marketers.
Reliability in Email Delivery
When sending cold emails, one of the primary concerns is ensuring your emails consistently reach the recipient’s inbox. Zoho SMTP excels in this area by providing a dependable platform for outbound email delivery. The server repeatedly attempts to deliver emails until they reach the recipient, which is critical for cold email campaigns where every email counts.
Simplicity in Email Communication
You only need to compose your message and send it; Zoho SMTP handles the complexities of routing these emails through various servers until they reach their destination. This straightforward process eliminates complications, making it ideal for businesses focusing on cold email marketing, where speed and efficiency are key.
Assured Email Delivery
The persistence of Zoho SMTP in ensuring emails make it to the recipient’s server is invaluable. By retrying delivery until the email is received, Zoho SMTP maximizes the chances of your message being read.
Security and Control over Email Transmission
Zoho SMTP provides enhanced security features and allows for detailed configuration to handle sensitive information securely. This level of control is crucial for businesses that send out cold emails containing confidential content or proposals, ensuring that information remains secure and is only accessed by intended recipients.
Scalability for Large Organizations
For organizations that send a high volume of emails, Zoho SMTP is scalable to meet these demands. It supports bulk emailing, which is often necessary in large-scale cold email campaigns. This scalability ensures that as your business grows and the volume of your email communication increases, Zoho SMTP can handle this growth, maintaining high deliverability and reliability.
How to Enable Zoho Mail SMTP Settings?
You can turn on the Zoho Mail SMTP Settings by –
-
Start by logging into your Zoho Mail account. Once you’re in, you should open the settings menu.
-
In the Settings menu, look for the ‘Mail Accounts’ tab. This section manages all the email accounts you have set up with Zoho.
-
Click on the email accounts’ SMTP you want to configure.
-
Then, you will have to scroll to find the SMTP settings option.
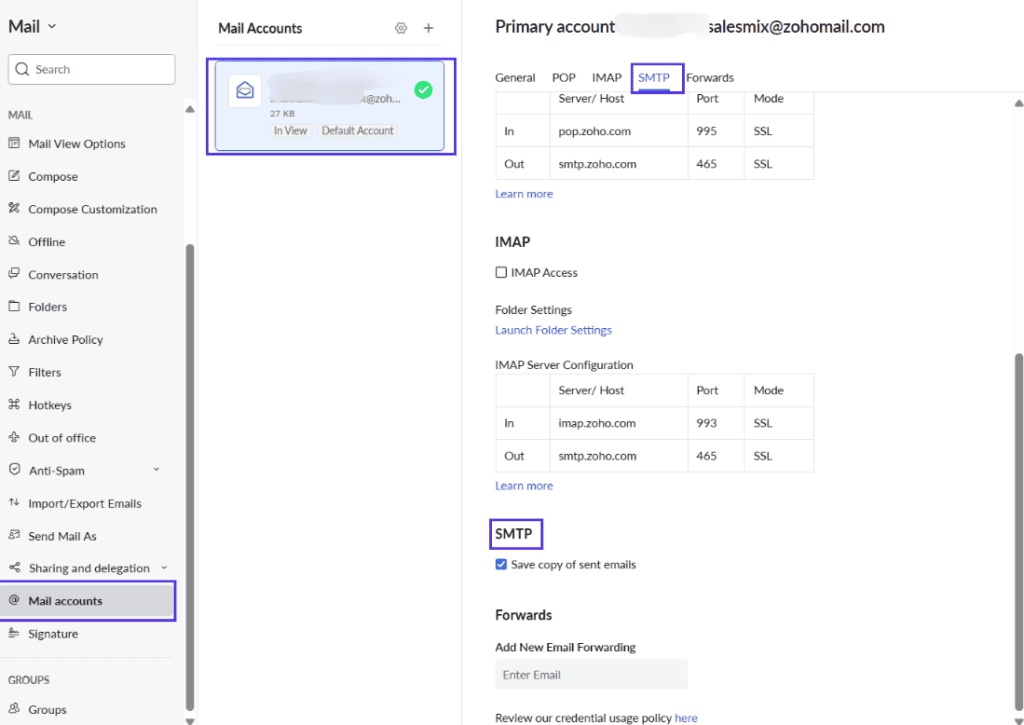
Zoho SMTP Settings
Zoho SMTP Settings Configuration – SSL
We will go through the Zoho SMTP configuration credentials for SSL security types for both personal and organizational users.
Credentials for Personal Users
Personal users utilize a unique email address tied to their identity, like [email protected]. Below are the SMTP settings specifically for the personal Zoho accounts.
-
Outgoing Server Name: smtp.zoho.in
-
Port: 465
-
Password: Same as your ZOHO Mail account’s password
-
Security Type: SSL
-
Require Authentication: Yes, required
Credentials for Organization Users
Organizational users use an email address linked to a specific domain, for example, [email protected]. The SMTP settings for these organizational Zoho accounts are as follows –
-
Outgoing Server Name: smtp.zoho.in
-
Port: 465 with SSL and 587 with TSL
-
Security Type: Both SSL and TSL are available
-
Require Authentication: Yes, required
Zoho SMTP Settings Configuration – TSL
Let’s look at the Zoho SMTP settings credentials for the TSL security type.
-
Outgoing Server Name: smtp.zoho.in
-
Port: 587
-
Password: Same as your ZOHO Mail account’s password
-
Security Type: TSL
-
Require Authentication: Yes, required
How to Enable IMAP client and POP for Zoho Mail Server?
IMAP (Internet Message Access Protocol) and POP (Post Office Protocol) are crucial for managing cold emails effectively because of their contribution to the receiving aspect of your emails communications.
IMAP
Enabling IMAP (Internet Message Access Protocol) for your Zoho Mail account is crucial for managing your emails across various devices. You can follow this step-by-step guide to activate IMAP access:
-
Go to the settings menu after logging into your Zoho Mail account.
-
Within the settings menu, locate and click on the ‘Mail Accounts’ tab.
-
From the list of mail accounts, select the email account for which you want to enable IMAP.
-
After selecting the desired email account, look for the ‘IMAP’ section within this tab.
-
In the IMAP section, you will find a checkbox labeled “IMAP Access.” Check this box to enable IMAP for the selected email account.
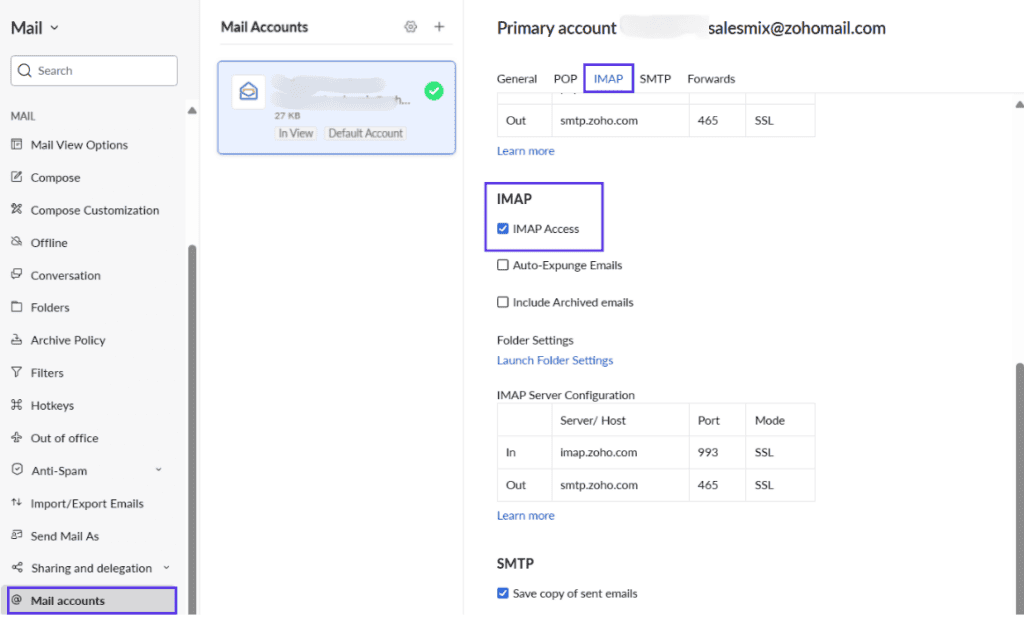
Zoho Mail IMTP Settings
POP
Activating POP (Post Office Protocol) for your Zoho Mail account allows you to download emails to your local computer by enabling offline access and management. Here’s a straightforward guide to help you enable POP in your Zoho account:
-
Sign into your Zoho Mail account and go to the settings menu.
-
In the Settings menu, find and click on the ‘Mail Accounts’ tab. This section houses all the settings related to the email accounts you have set up within Zoho Mail.
-
Scroll through the list of your email accounts and select the one you wish to configure for POP access. Click on this account to open its specific settings.
-
Look for the’ POP’ section in the settings of the chosen email account.
-
In the POP settings area, you will see a checkbox labeled “POP Access.” Tick this checkbox to turn on POP access for the selected email account.
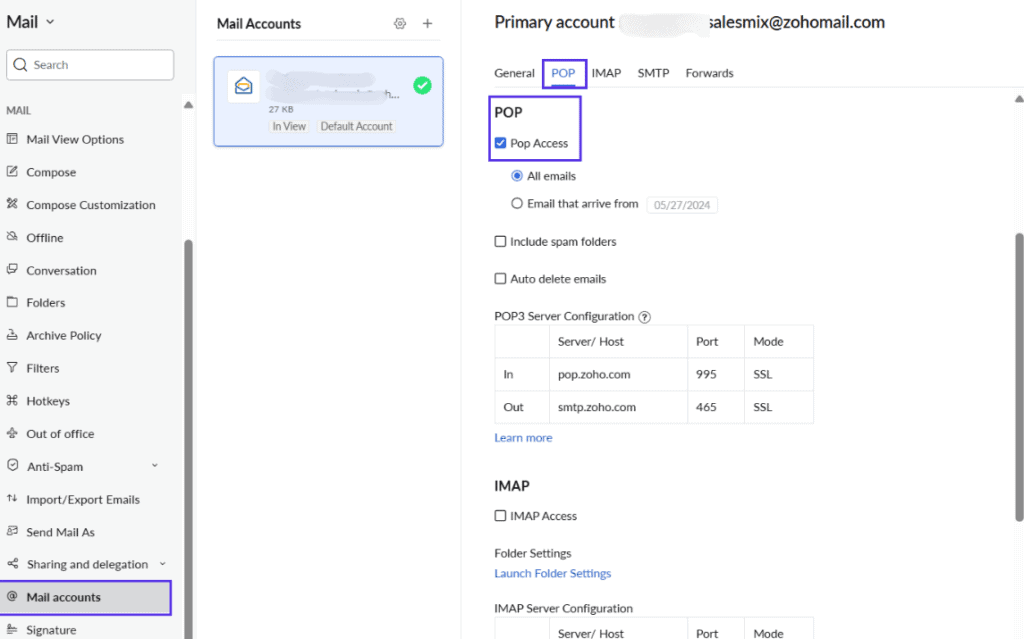
Zoho Mail POP Settings
Troubleshooting Issues You Might Face with Zoho SMTP Settings
Let’s see how you can deal with some issues that you may face now and then with Zoho SMTP settings.
Unable to Connect to Outgoing Server/SMTP Server
Occasionally, email clients may attempt to connect to the default port 25 when setting up SMTP servers. For Zoho Mail, it’s essential to use the correct SSL or TLS ports, namely 465 or 587. If issues persist after verifying these port settings, obtaining traceroute details for smtp.zoho.com and contacting Zoho support with your account details and a description of the problem, including screenshots, can help resolve connectivity issues efficiently.
Relaying Disallowed Error
This error typically appears when there’s a mismatch between the email address used in your SMTP settings and the one registered as your account’s outgoing server. It can occur due to typographical errors in the email address during setup or if an incorrect email address is hardcoded in applications. You should double-check and correct the email address in your SMTP settings to rectify this to ensure consistency and proper email delivery.
Unable to Receive Emails from Website Contact Forms
Suppose you’re experiencing issues receiving emails from website contact forms. In that case, it might be due to your Web Host’s configuration, which could be set to handle emails locally due to matching domain names.
To resolve this issue, you have to access your WebHost settings and select the Remote Email server option to indicate that emails should be delivered externally. Turn off any Local Email Delivery settings in your WebHost configuration to ensure emails from your web forms are routed correctly to Zoho Mail servers and reach your inbox as intended.
Duplicate Sent Copies
When using a different email client with smtp.zoho.com, sent emails are automatically saved in Zoho’s Sent folder. However, many email clients, like Gmail from Google Apps and Outlook, also save a local copy, resulting in duplicates. To prevent this, Zoho offers a setting to avoid saving another copy in the Sent folder.
You will need to go to Settings, then to Mail Accounts, and under the SMTP section for your email address, uncheck ‘Save copy of sent emails.’ It stops the additional saving of sent emails, keeping your Sent folder clutter-free.
How to Connect SalesMix with Zoho SMTP?
Adding Zoho Mail to your SalesMix account can streamline cold email campaigns and enhance sales automation processes. Here’s how you can connect Zoho Mail to SalesMix:
-
Open the “Email Account” Tab in SalesMix
-
Click on the “Add Email” Button

Add Email in SalesMix
-
Select Zoho Mail from the Options
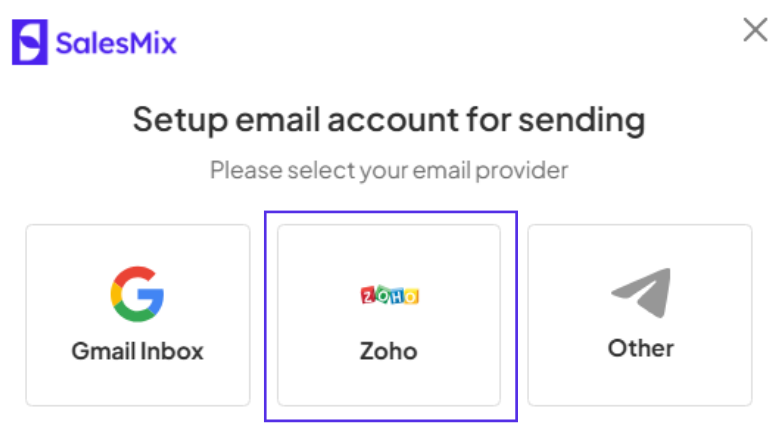
Zoho Mail Integration with SalesMix
-
Upon selecting Zoho, you will be redirected to the Zoho Mail sign-in page. Enter your credentials to log into your Zoho Mail account. After logging in, you will be prompted to give SalesMix permission to access your Zoho Mail.
You will then have to complete the authorization to integrate SalesMix with your Zoho Mail.
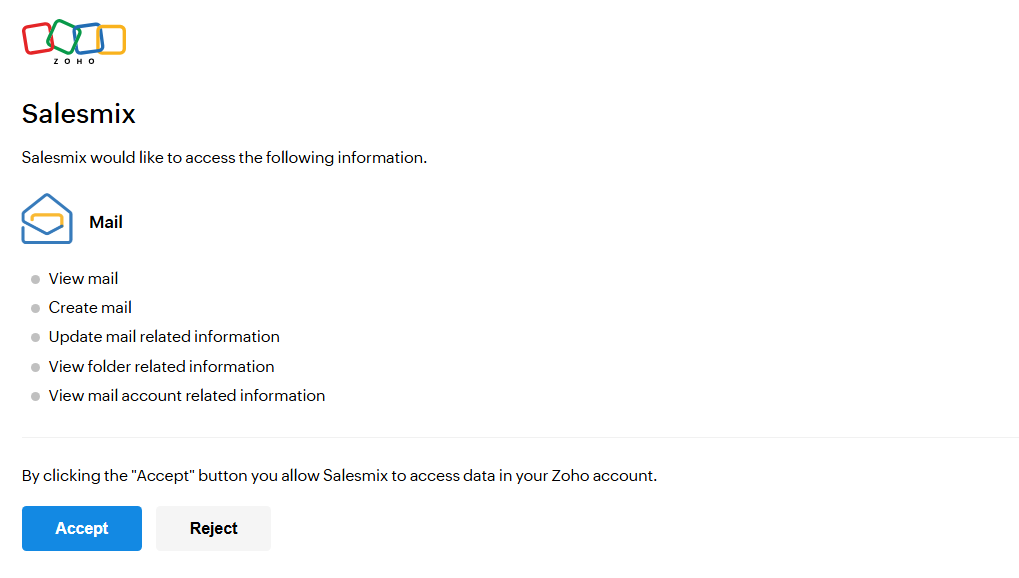
Zoho Permission for SalesMix
Conclusion
The proper setup of Zoho SMTP can transform your outreach strategies in the cold email campaign. It empowers your campaigns with the assurance of delivery and the sophistication of handling emails in a secure and controlled manner.
As you scale, these settings will support the growing volume of communications without compromising on speed or reliability.