Table Of Contents
Struggling and feeling clueless about finding the right prospects who will actually respond to your cold emails?
For many founders and marketers, the challenge isn’t sending emails – it’s making sure they land in front of the right people. Without a solid prospect list, even the most carefully crafted outreach falls flat, leaving you spinning your wheels with little to show for it. That’s where LinkedIn Sales Navigator comes in to help you tailor your search based on the exact criteria that matter to you.
In this guide, I will walk you through creating a high-quality prospect list on LinkedIn Sales Navigator. If you’re ready to stop wasting time on generic outreach and start connecting with prospects who convert, let’s dive in!
Step-by-Step Guide on Building Prospect List on LinkedIn Sales Navigator
Let’s dive into how you can start connecting with prospects who will convert by building an effective prospect list on LinkedIn Sales Navigator.
Step 1: Build A List of Companies Matching your ICP
The foundation of a strong prospect list is a carefully curated selection of companies that align with your Ideal Customer Profile (ICP). Your ICP serves as the blueprint for identifying businesses most likely to benefit from your SaaS solution. Targeting companies that fit this profile will help you focus your outreach efforts where they’ll be most impactful, maximizing efficiency and results.
You can use Sales Navigator’s Account Search Filters as the necessary precision helping hand to define the key attributes that characterize your ICP. The filters include:
- Location
- Headcount
- Industry
- Growth
- And many more
You can also take the time to explore the available and additional filters to get further refinement in the filtering process.
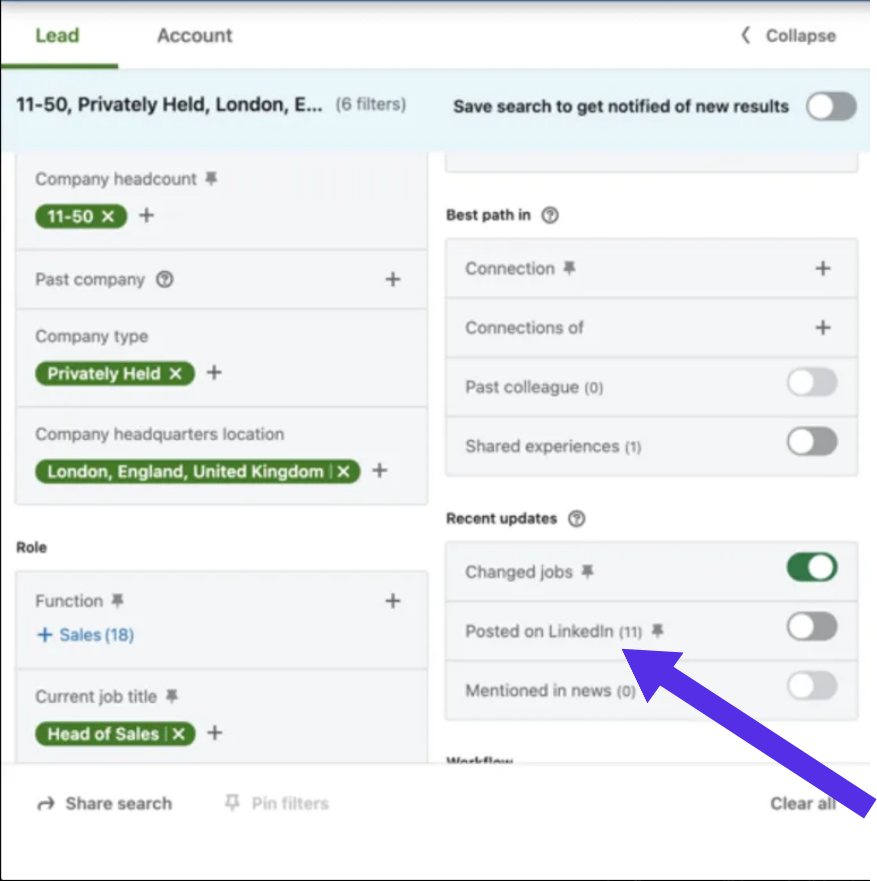
Use account search filters.
Step 2: Save & Create The New List
Once you’ve identified a group of companies that align with your Ideal Customer Profile (ICP), the next step is to organize and save this data efficiently. Creating a structured list is crucial for managing your outreach efforts and keeping track of high-priority prospects.
You need to do the following by navigating below the search keyword bar to save and create the list –
- Tick all the checkboxes or those for the companies or accounts you want to save.
- Click on “Save to list”.
- Select “Create new list” to establish a dedicated space for the selected prospects.
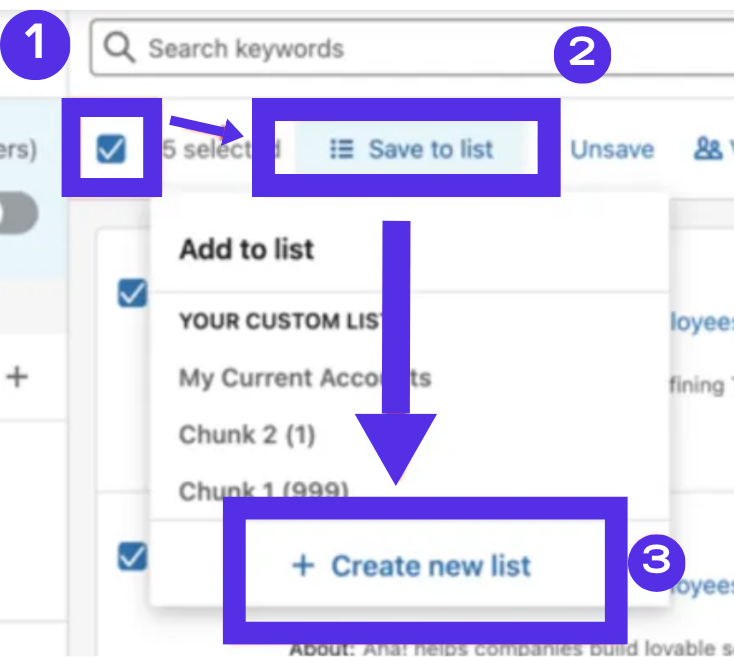
Save & Create the List
Step 3: Find The People Working in The Listed Companies
After creating a well-organized list of target companies, the next step is to identify the individuals working within these organizations who are most relevant to your SaaS solution. This is where the true value comes into play, as you can connect with decision-makers, influencers, and stakeholders in a highly targeted way.
You will have to –
- Navigate to the “Lead” search category in Sales Navigator.
- Access the Workflow filter to refine your search.
- Select “Account Lists” from the available options.
- Choose the list you previously created and link it with your search.
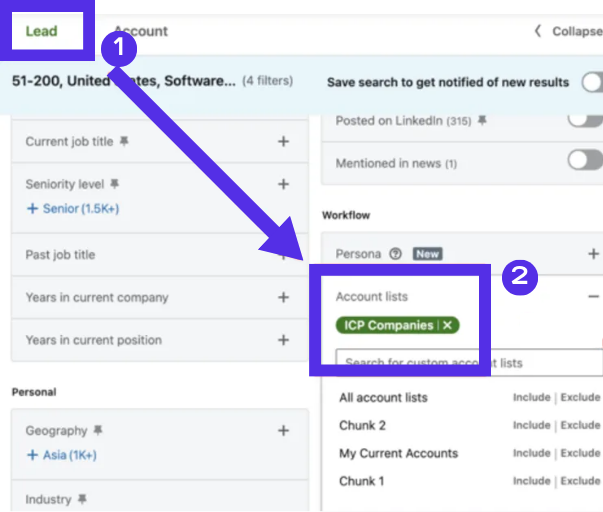
Account lists in Lead search
You can then view the list of people working in the selected companies on the right side of the screen.
Step 4: Find Your Buyer Persona
After identifying the companies and individuals on your target list, the next critical step is pinpointing your buyer persona within those organizations. A buyer persona represents the decision-makers or influencers most likely to resonate with your SaaS offering. These individuals have the authority to purchase your solution or play a significant role in the decision-making process.
You can use the following lead filters available in Sales Navigator to refine your list and locate your buyer persona:
- Job Title: Job title is one of the most direct indicators of relevance and can be helpful for filtering. For example, if you’re selling a SaaS tool for marketing automation, targeting professionals with titles like “Marketing Manager” or “Head of Digital Marketing” would be ideal.
- Years in current position: Those with significant tenure are likely to have a deeper understanding of their organization’s needs and may have more influence in the buying process. Conversely, newer hires could be more open to innovative solutions as they aim to make an immediate impact.
- Keyword searches: You can leverage this filter to narrow down your list and identify professionals whose profiles align closely with your ideal buyer persona. For instance, if your SaaS product is designed for streamlining project management, searching for terms like “agile,” “scrum,” or “workflow optimization” can yield strong leads.
Step 5: Save The Search
After investing time and effort in building a detailed and accurate search, preserving your work for future use is essential. Sales Navigator allows you to save your search, a feature that not only keeps your hard work accessible but also keeps it dynamic. Once saved, LinkedIn automatically monitors for new leads that match your criteria and alerts you weekly about fresh prospects.

Generate prospect list on autopilot with Saved Search
Saving your search is especially useful for SaaS marketers aiming to maintain a consistent pipeline of potential customers and lead generation. For example, if your target audience includes tech startups in growth phases, a saved search ensures you’re notified as new companies or decision-makers enter your predefined criteria. These automated updates allow you to stay proactive, reaching out to prospects at the right time with minimal manual intervention.
Once you’ve saved a search and have a robust list of qualified prospects, the next logical step is to make the data actionable. You can choose among a wide range of options available to export this information using a LinkedIn scraping tool.
Conclusion
Finding the right prospects is no longer a guessing game when you can utilize a tool like LinkedIn Sales Navigator. You can build a strong base to take control of your email campaigns by following the step-by-step process mentioned.
The beauty of using Sales Navigator is in its ability to keep your sales prospecting efforts sharp and up-to-date. Saving your searches and setting up alerts ensures that you’re always discovering new leads that match your criteria, keeping your pipeline full and relevant.