Table Of Contents
Finding it hard to set up your Gmail SMTP settings?
Setting up Gmail SMTP settings can often seem complex, especially with the myriad of options and technical terms involved. However, it is crucial to understand the SMTP settings and configure them in the right way for a cold email campaign.
In this article, we will simplify the process of configuring Gmail SMTP settings through a step-by-step guide. Keep reading to learn how to use your Gmail SMTP setting for a successful cold email campaign initiation.
What is The Gmail SMTP Settings?
Gmail SMTP (Simple Mail Transfer Protocol) settings define the necessary server and port information for sending emails from your Gmail account through other email clients or applications. These settings help you maintain secure connections and ensure your emails go successfully through Gmail’s servers.
Why Should You Use The Gmail SMTP Settings?
Using the Gmail SMTP settings for your email communications offers several compelling advantages. Let’s look at some of them.
1. Dependable Service with Security
Configuring your email client with Gmail’s SMTP server means you tap into the robust infrastructure of one of the most widely used and trusted email services in the world. Your emails are more likely to get to the recipient’s inbox consistently and without delay, regardless of the volume.
Gmail’s SMTP servers use strong encryption protocols such as TLS and SSL to secure your email connections. It ensures that any data sent from your email client to Gmail’s servers is protected against interception by third parties.
Google’s commitment to user safety also extends to its SMTP service, which includes continuous updates and protections against the latest security threats. This proactive approach helps safeguard your email account from potential vulnerabilities.
2. Simplified Integration Across Platforms and Clients
Choosing to use Gmail SMTP settings can significantly simplify the way you manage and integrate email communications across various platforms and clients. Most modern email clients and platforms support SMTP, and setting them up with Gmail is straightforward.
With Gmail SMTP, you can instantly connect your email client or application directly to Gmail’s powerful mailing infrastructure. You will be able to send emails from your preferred platform without needing to switch back and forth between different services.
Gmail’s SMTP settings work universally across various software and hardware, ensuring that you can send emails from any device or application. This level of compatibility is crucial for businesses and individuals who rely on multiple tools and need their systems to communicate efficiently without technical hitches.
3. Advantageous for Developers and Product Teams
For developers, the appeal of using Gmail’s SMTP lies in its simplicity and the extensive documentation provided by Google. This means less time spent on setup and troubleshooting and more time focused on product development. It is also compatible with various programming languages and frameworks to simplify the process.
Product teams benefit from Gmail SMTP settings because they can reliably send emails from their applications. This reliability translates into fewer customer complaints related to email delivery issues, such as missed notifications or undelivered messages.
4. Streamlined Email Communications for Web Apps
For web developers, one of the primary benefits of using Gmail SMTP is the simplicity it brings to email management. Instead of building and maintaining their own mail servers, developers can use Gmail’s established servers to send emails.
It saves development time and reduces the costs associated with server maintenance and security upgrades. Gmail further handles all aspects of email delivery, including queueing, retrying failed sends, and managing server load, which can otherwise be complex and resource-intensive tasks.
5. Developing Custom Applications with Email-Sending Features
When you choose Gmail SMTP settings for your application, you’re leveraging Google’s proven infrastructure. It means you can rely on their servers and the Gmail API to manage the heavy lifting associated with email delivery – everything from handling large volumes of outgoing emails to dealing with security protocols that protect your data.
What are The Different Gmail SMTP Methods?
Understanding the 3 different methods available for using Gmail’s SMTP server can greatly enhance how you manage and send your emails. We will mainly go through setting up the first 2, as they are the most relevant for an email marketing campaign.
Gmail’s SMTP Server
Gmail SMTP server settings are primarily accessible via two secure connection methods – TLS and SSL for your personal accounts. These methods are pivotal in ensuring that your email communications have encryption and are secure from any potential interception.
Gmail SMTP’s All Info at A Glance
-
Gmail SMTP Server Address: smtp.gmail.com
-
Username: Your Gmail Address (e.g. [email protected])
-
Gmail SMTP Port Numbers: 587 (With TLS) & Alternative is 465 (With SSL)
-
Gmail SMTP Password: Same password as your Gmail account
-
Internet Protocol: Allows Dynamic IPs
-
Sending Limits: 500 per day for Regular Accounts
SMTP Relay Service (for Google Workspace)
The SMTP Relay Service offers a powerful method for managing outbound emails for Google Workspace using organizations. It allows administrators to route emails through Google’s servers but with added flexibility and control.
This method can bypass spam filters for emails sent to your own domain, facilitating reliable internal communication. Additionally, it adheres to Google’s high standards of security, providing encryption and secure data handling to protect every email you send for your cold email campaigns.
SMTP Relay Service’s All Info at A Glance
-
Gmail SMTP Server Address: smtp-relay.gmail.com
-
Username: Your Full Gmail Address (e.g. [email protected])
-
Gmail SMTP Port Numbers: 587 (With TLS), 465 (With SSL), and 25 (with TLS/ SSL).
-
Gmail SMTP Password: Same password as your Gmail account
-
Internet Protocol: It requires 1 or 2 static IP addresses.
-
Sending Limits: 2,000 emails within 24 hours.
Restricted Gmail SMTP Server
It is a specific method from Google that caters to users who need to send emails without requiring SMTP authentication credentials. Using the Restricted Gmail SMTP Server, you can only send emails to Gmail or Google Workspace account users.
This method limits you to sending messages only to recipients within the Gmail or Google Workspace domains. As a result, it is less flexible than the full SMTP server but ideal for internal communications within an organization.
The Restricted Gmail SMTP Server is particularly beneficial for organizations that use a lot of automated reporting tools or monitoring systems to send status emails to a central administrative Gmail account.
SMTP Relay Service’s All Info at A Glance
-
Gmail SMTP Server Address: aspmx.l.google.com.
-
Username: Your Gmail Address (e.g. [email protected])
-
Gmail SMTP Port Numbers: 25 (TLS is not required)
-
Gmail SMTP Password:
-
Internet Protocol: Dynamic IPs are allowed.
-
Sending Limits: You can only send emails to Gmail or Google Workspace users.
How do You Set Up the Google SMTP server settings?
Let’s look at how you can set up and configure Google’s SMTP server settings.
Note: Google is already phasing out the “Less Secure Apps” authentication method’s option in favor of more secure methods, particularly for Google Workspace users. As an alternative, Google highly recommends using App Passwords, especially if you have enabled 2-Step Verification.
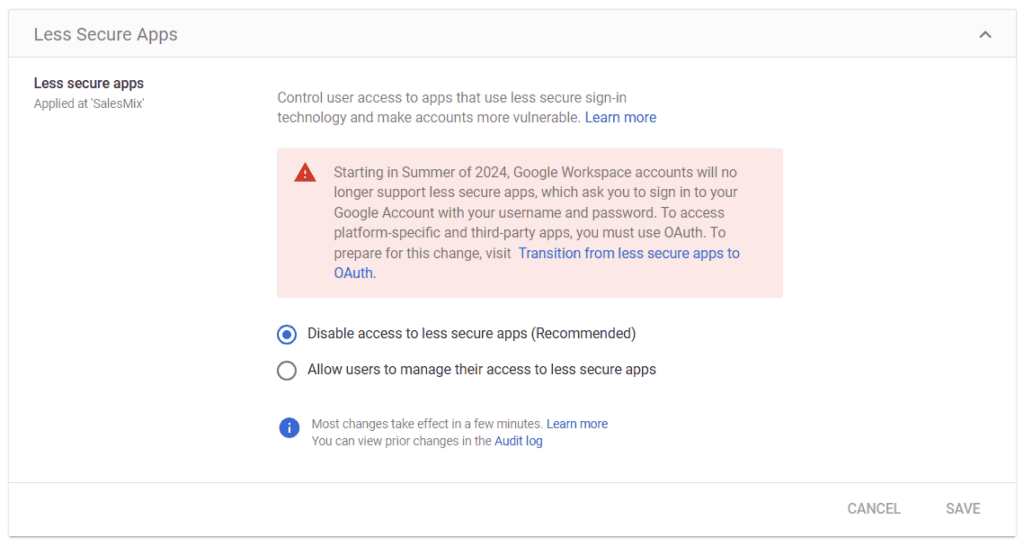
Less Secure Apps Discontinued
1. Generate An App Password for 2FA Bypass
Generating an app password is a straightforward process, but it is crucial for ensuring that your applications can securely interact with Gmail without compromising your account’s security through 2-step verification.
Considering you are already in the Google account settings for the earlier step, you now need to head to the “Security” tab on this page. In the “Signing in to Google” section, you will find the option for “2-Step Verification” Click on this option, and you will then find “App Passwords” You may need to sign in again for security purposes.
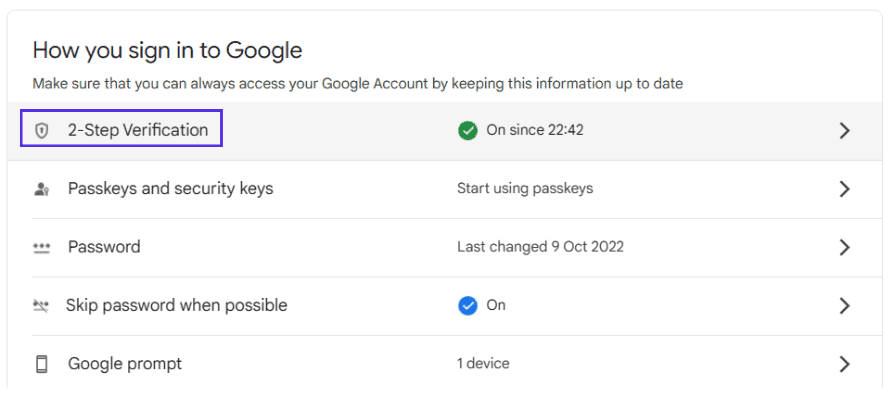
2-step Verification Option
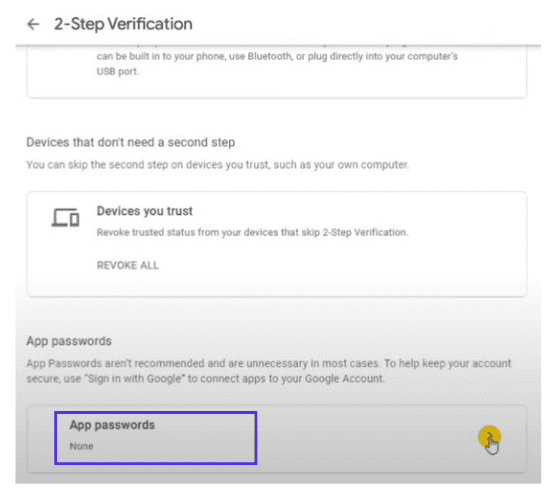
App Password Option
After doing so, you’ll see the option to select the app and device for which you need the password. You should choose the app from the list provided or select “Other” to customize the name if your app isn’t listed.
Once you’ve selected the appropriate options, click on “Generate.” Google will then display a 16-character password. This password is unique and will not be shown again, so be sure to enter it into your application or email client immediately.
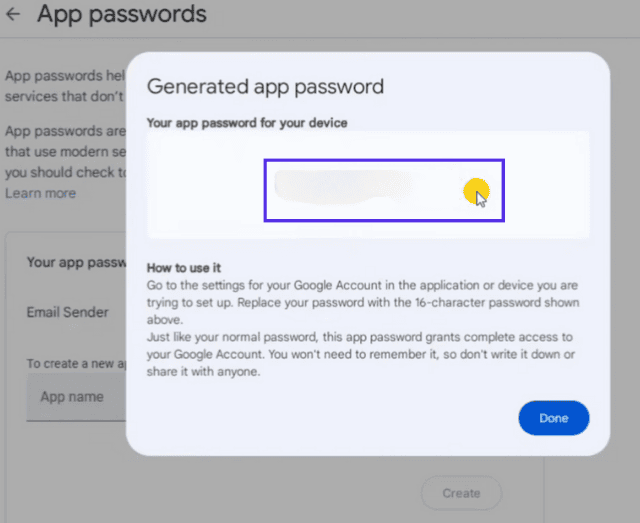
16-Digit App Password
This app password allows your email client or application to bypass the 2FA protection. It ensures the approved clients and apps can securely access Gmail’s SMTP without needing to pass through the two-factor authentication process each time.
Note: If you are comfortable with having your account without a 2-step verification process, you can skip this step. However, it is recommended to use a 2-step verification for enhanced security.
2. Configure Gmail SMTP Settings on Email Client
You have to configure Gmail’s SMTP settings on the email client as the final step in ensuring you can send emails directly from your preferred software. This setup is essential for maintaining a streamlined communication channel that leverages Gmail’s robust infrastructure.
Here, you will need to input several pieces of information specific to Gmail’s SMTP server. You should put this information there in the respective places.
-
Gmail SMTP Server Address: smtp.gmail.com
-
Username: Your Gmail Address (e.g. [email protected])
-
Gmail SMTP Port Numbers: 587 (With TLS) & Alternative is 465 (With SSL)
-
Gmail SMTP Password: Same password as your Gmail account
-
Internet Protocol: Allows Dynamic IPs
-
Sending Limits: 500 per day for Regular Accounts
How to Set Up The SMTP Relay Service?
To begin configuring your SMTP relay service, you will need to log in to the Google Admin console at admin.google.com with your Google Workspace Admin credentials.
Once logged in, navigate through the console by clicking on “Apps” on the left side panel. It will lead you to further options, under which you need to select “Google Workspace” and then select “Gmail” from the dropdown.
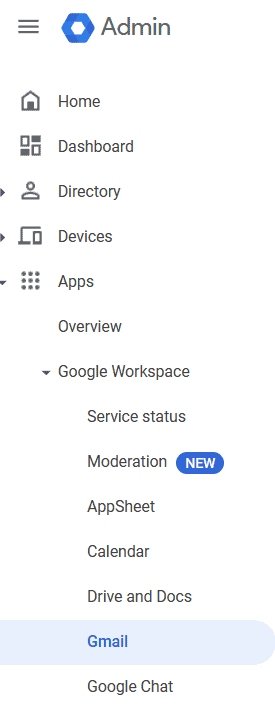
Select the Gmail option from the Google Workspace dropdown.
The next step is to click on the “Routing” tab. This section contains various configuration settings for your Gmail services, including the SMTP Relay Service.
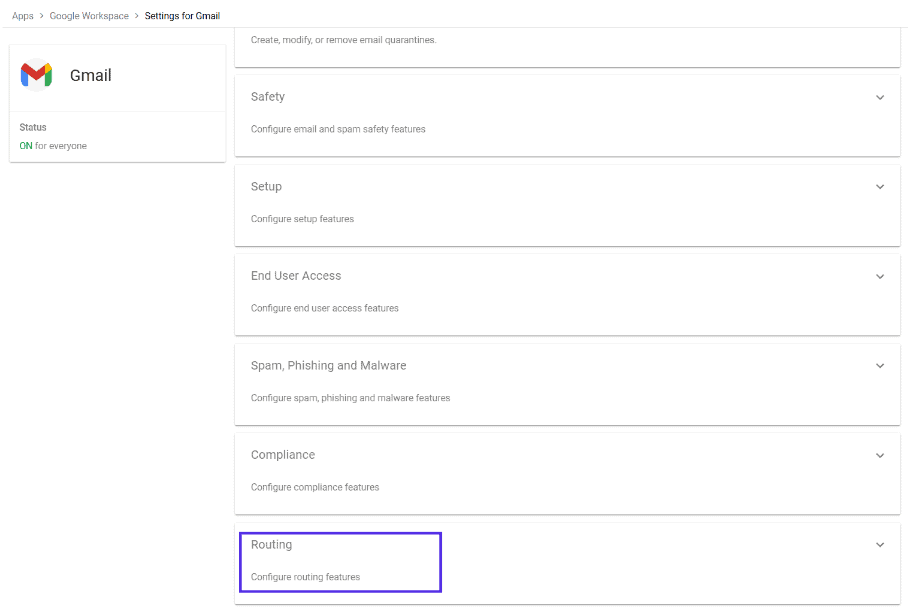
Routing – Google Admin
In the Routing for Gmail, scroll until you find the section labeled “SMTP Relay Service.” Clicking on the “Configure” button in this section will allow you to modify or set up new SMTP relay parameters.
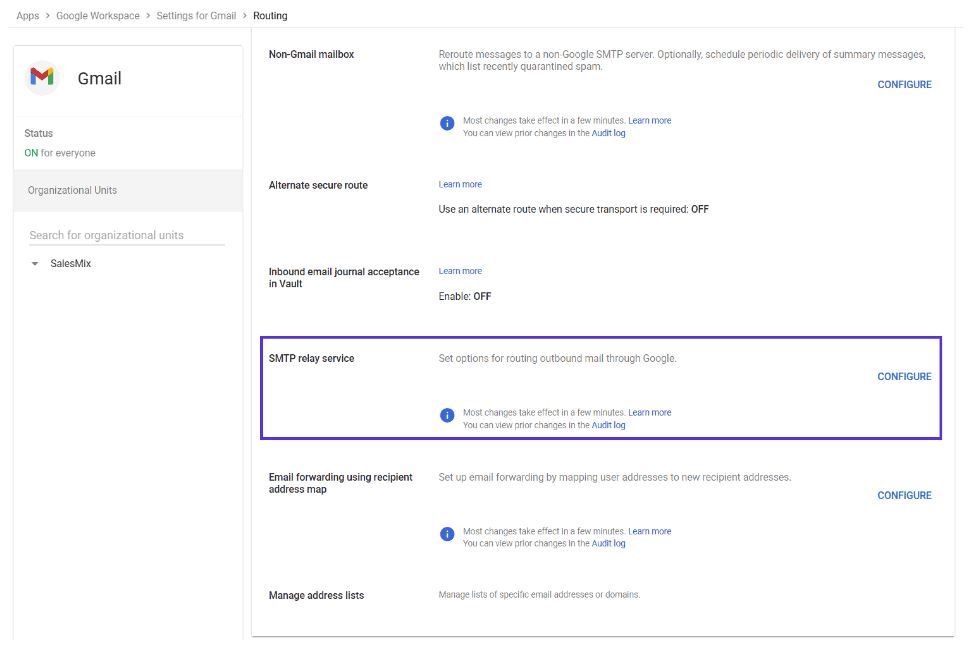
SMTP Relay Service Option on Google Admin Console
For security, it’s advisable to check the box for “Only accept mail from the specified IP addresses.” Following this, you can add the required IP addresses by selecting the “Add IP range” button. This ensures that only emails sent from these specified IP addresses are allowed through the SMTP Relay.
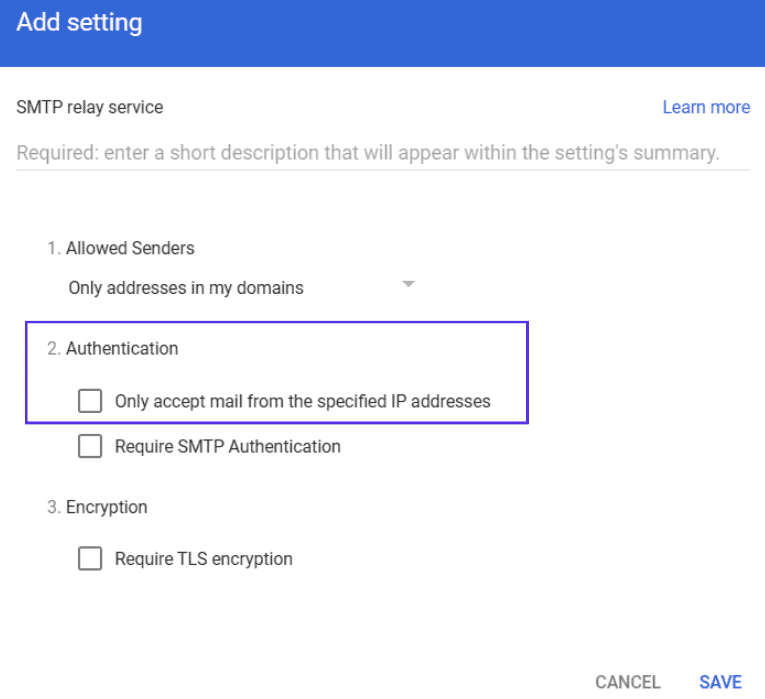
SMTP Relay Service
Before finalizing the setup, return to the Advanced Settings for Gmail to ensure that “Comprehensive mail storage” is checked. This setting helps in maintaining a complete backup of all emails that pass through the SMTP relay, which is crucial for data security and compliance.
You should carefully name and configure each setting according to the specific requirements of your organization. The requirements can include authentication details, the allowed IP addresses, and the level of encryption required.
After configuring the necessary settings, the changes might take up to 24 hours to propagate fully.
How do You Turn on POP/IMAP to Complement SMTP Settings?
While SMTP settings are crucial for sending emails, enabling POP (Post Office Protocol) or IMAP (Internet Message Access Protocol) is equally important for receiving and managing your incoming mail effectively in cold email marketing campaigns. SMTP works exclusively for outgoing messages, so turning on POP or IMAP allows your email client to retrieve and interact with messages stored on the mail server.
To enable these settings in Gmail –
-
Start by logging into your Gmail account.
-
Locate the gear icon in the upper right corner of your Gmail interface. Clicking this icon will open a quick settings menu, where you should select “See all settings” to access the full settings menu.
-
Navigate to the “Forwarding and POP/IMAP” tab within the settings menu. This area manages how your Gmail account interacts with different mail clients.
-
Find the ‘IMAP access’ section and turn on the option to “Enable IMAP.”
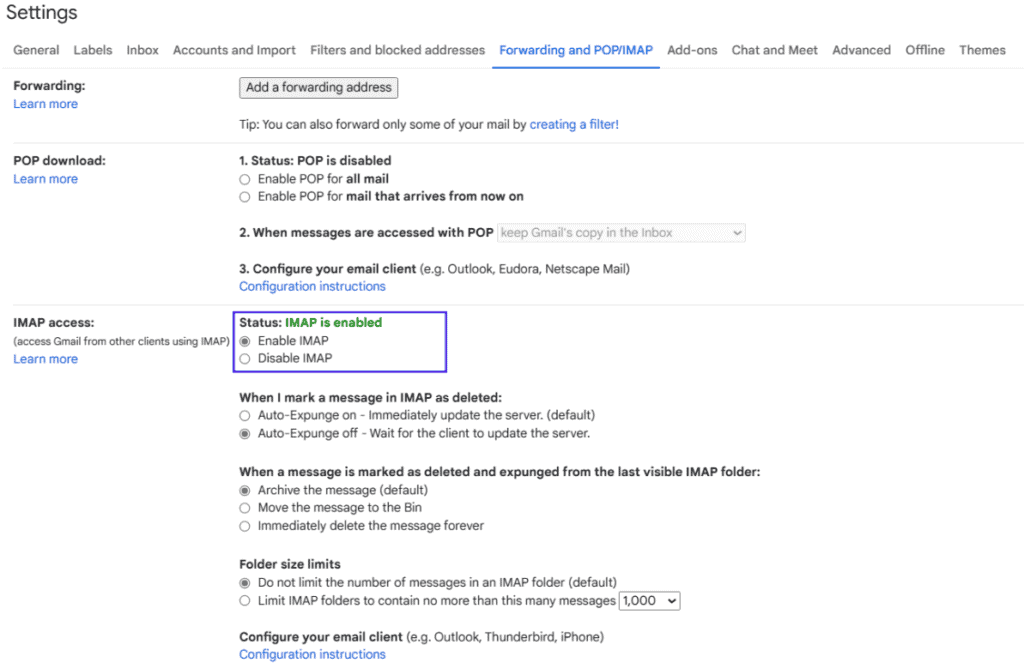
IMAP settings in Gmail Account
Don’t forget to click “Save Changes” to ensure your changes stay.
Use the More Convenient oAuth Option in SalesMix for Connection
SalesMix is a solid tool that can help you enhance the effectiveness of cold email campaigns. A crucial aspect of setting it up involves adding your email accounts for the email warmup.
For those using Google Workspace, SalesMix offers a more convenient connection option through OAuth, which simplifies the integration process significantly compared to traditional SMTP setups.
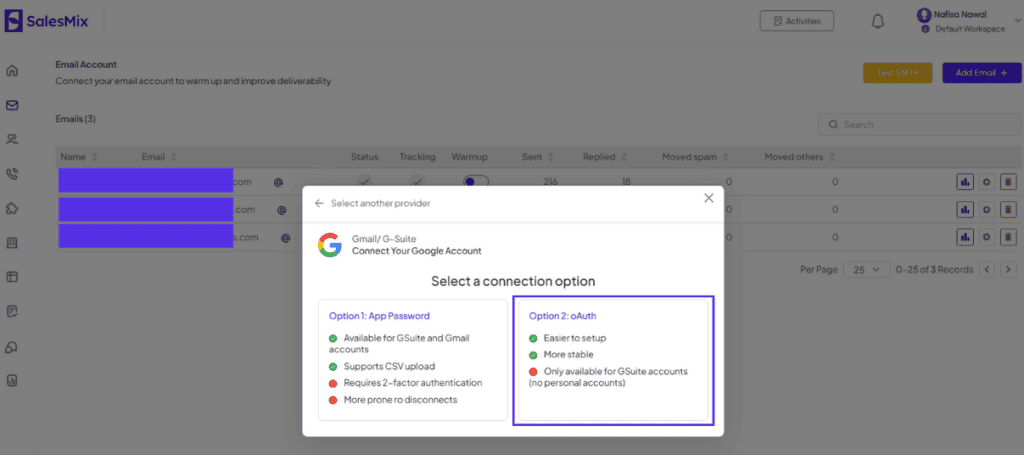
oAuth option in SalesMix
OAuth is a modern authentication protocol that allows SalesMix to securely access your Google services without handling your passwords directly. This method is easier to set up and provides a more stable connection for managing your email campaigns. It’s important to note, however, that this option is available exclusively for Google Workspace accounts and not for personal Gmail accounts.
To connect your Google Workspace account with SalesMix through oAuth, you need to –
-
Navigate to your Google Workspace Admin Panel. This is where you can manage security settings and app permissions for your entire organization.
-
Select “Security” from the menu and then select “Access and data control” followed by “Api controls”. This path will lead you to the control center for third-party app interactions with your Google services.
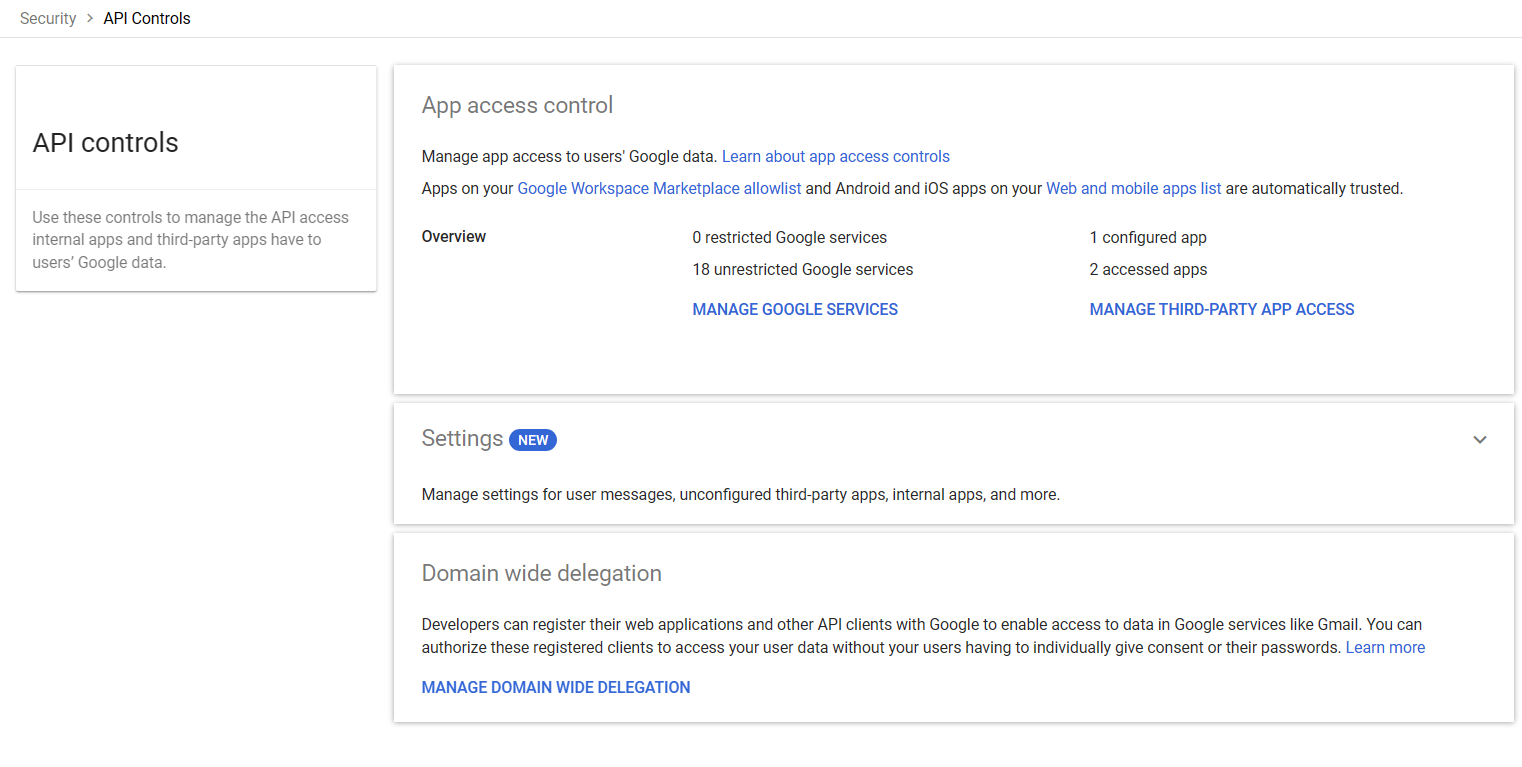
API controls in Google Admin Console
-
Click on “MANAGE THIRD-PARTY APP ACCESS”.

Manage Third Party App Access for oAuth.
-
Click on “Add app”, then select “oAuth app Name Or Client ID” to SalesMix by entering the client ID that SalesMix will provide you with.
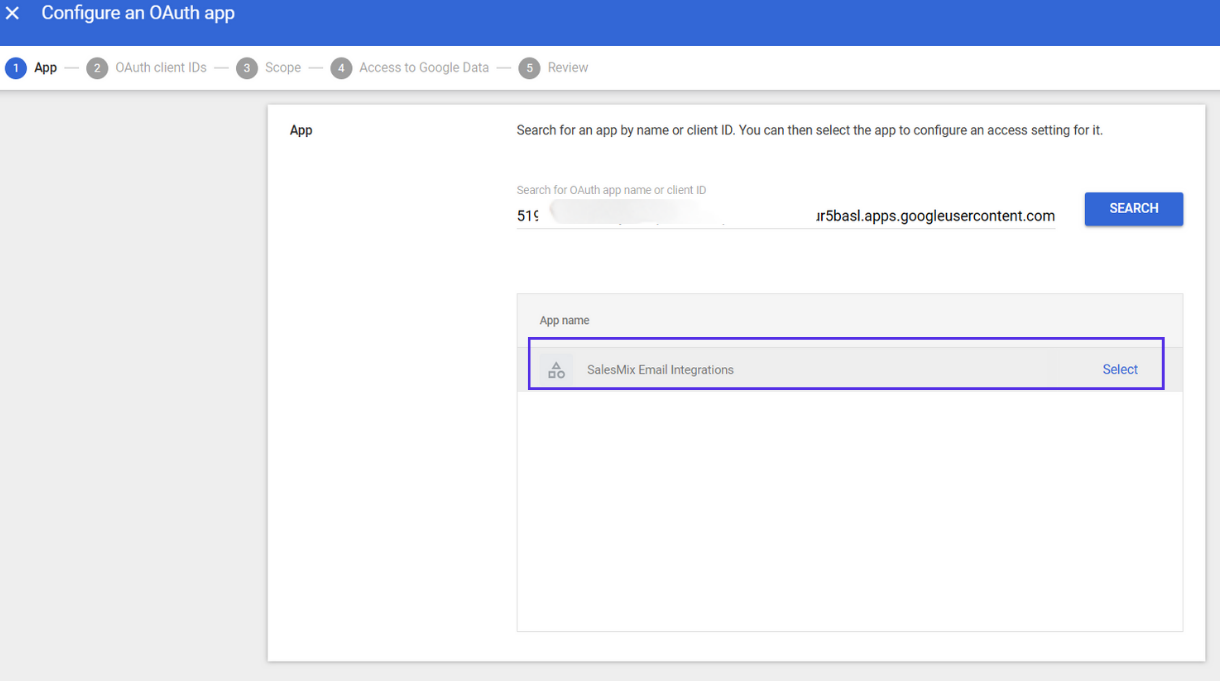
SalesMix on the oAuth App List
-
After locating SalesMix in the list, the next step is to approve it by selecting “Trusted Can Access all Google services”. That’s it, you’re done!
Conclusion
We have walked through the comprehensive steps for setting up Gmail SMTP settings and complementing them with POP/IMAP. You are now equipped with a robust understanding of optimizing your email functionalities for your cold email campaign.
As you move forward, remember that the continuous evolution of email technologies and Google’s protocols may introduce new features or requirements. Staying updated with these changes will help you maintain an optimal setup. You can revisit your settings periodically to ensure they align with the latest security practices and functionality enhancements.

